Tuesday, January 4, 2022

Frontend cross domain communication make easy

Context

Building microservice in front-end is getting popular, there is even a book about it.

If you are building a front-end platform for public or internally for your company, most likely you will encounter the need to enable multiple teams to develop and release in parallel. To ensure productivity, your platform should provide solution for isolated team code base as well as release pipeline.

Which means the final product that present to end users will be a master website loads a bunch of other websites into its DOM. In order to provide enough security and avoid one sub app crash the entire website, you will have to use iframe as the container, as Web Component is far from mature.

One of the major issue with iframe is, communicate over the boundary is a huge pain. As “postMessage” API is like UDP, it is very hard and cumbersome even just exchange some simple text.

“Bridge” for the rescue

I created an open source package Bridge, to provide developer friendly protocols for developer to easily communicate across boundary.

Expose an function/API

When you want to expose a function/API for others to invoke, similar to a backend API, with Bridge we just have to create a resolver and have your API as a function inside it.

// Here is a sample resolver that expose an "echo" API
class HostSampleResolver implements IResolver {
public name: string = "HostSampleResolver";

public echo(inputs: { message: string }, from: string): Promise<any> {
return new Promise((resolver) => {
setTimeout(() => {
resolver({ data: `echo from host: ${inputs.message}` });
}, 500);
});
}
}

To invoke above API, all your need is one function call. Name the resolver we want to invoke, the API we want to call, and pass in an input if there is any.

const response = await client.invokeResolver<string>("HostSampleResolver", "echo", { message: "message from client" });

Subscribe to an event

Bridge also supports pub-sub. Simply subscribe to an event that the other side might push over any notification.

client.subscribe("host-event", (inputs: any) => {
    console.log("Client - sub ===>", inputs);
});

To push notification to subscriber is just one function away

host.broadcastEvent(`host-event`, "YOLO");

Get your hand dirty

You can look at the full and runnable sample code from Bridge’s repository. To run it, please follow instructions from README.md

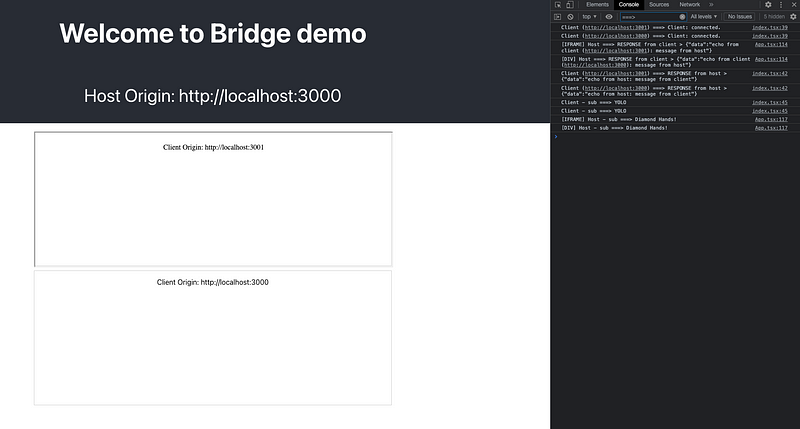
Here is a preview on what you will expect from our sample, where we have a website loads another website into a DIV as well as an IFRAME, and both sub-apps from the DIV and the IFRAME are communicating with the master website via Bridge.
Enjoy!

https://shrimpy.medium.com/frontend-cross-domain-communication-make-easy-c91fcdb6fb5d

Friday, May 1, 2015

Deploy your Go app onto Azure App Services (Websites) in ease

Try it:

             Click this link, you will deploy a sample Go web app onto your Azure subscription

Details:

Azure App Services now supports Go 1.4.2 with continues deployment. Once continues deployment is setup, every time you push code to your continues deployment branch, a new deployment will be trigger.

if you read the deployment log detaily, you will notice that Azure will create a Go workspace in temp folder, then copy your code to src\azureapp, build against azureapp folder and produce an "azureapp.exe".

Last, it generate a web.config and use HttpPlatformHandler to run your Go app.

Restriction:

  • Have to place main package at the root of your app
  • Currently only support Go 1.4.2, no able to select a specific Go version yet


Sample Go app:
    https://github.com/shrimpy/gotry

Sample Deployment Log:


Handling Go deployment.
Prepare workspace
GOROOT D:\Program Files\go\1.4.2
Creating GOPATH\bin D:\local\Temp\30a88a27-1ce2-49ef-b1b8-6f32716c9652\gopath\bin
Creating GOPATH\pkg D:\local\Temp\30a88a27-1ce2-49ef-b1b8-6f32716c9652\gopath\pkg
Creating GOPATH\src D:\local\Temp\30a88a27-1ce2-49ef-b1b8-6f32716c9652\gopath\src
Creating D:\local\Temp\30a88a27-1ce2-49ef-b1b8-6f32716c9652\gopath\src\azureapp
Copy source code to Go workspace
 -------------------------------------------------------------------------------
   ROBOCOPY     ::     Robust File Copy for Windows                              
-------------------------------------------------------------------------------
   Started : Thursday, April 30, 2015 5:52:54 PM
   Source : D:\home\site\repository\
     Dest : D:\local\Temp\30a88a27-1ce2-49ef-b1b8-6f32716c9652\gopath\src\azureapp\
     Files : *.*
 Exc Files : .deployment
   deploy.cmd
  Exc Dirs : .git
   .hg
   Options : *.* /NDL /NFL /S /E /DCOPY:DA /COPY:DAT /NP /R:1000000 /W:30 
 ------------------------------------------------------------------------------
 ------------------------------------------------------------------------------
                Total    Copied   Skipped  Mismatch    FAILED    Extras
    Dirs :         3         1         1         0         0         0
   Files :        13        13         0         0         0         0
   Bytes :    19.4 k    19.4 k         0         0         0         0
   Times :   0:00:00   0:00:00                       0:00:00   0:00:00
    Speed :              182743 Bytes/sec.
   Speed :              10.456 MegaBytes/min.
   Ended : Thursday, April 30, 2015 5:52:54 PM
 Resolving dependencies
Building Go app to produce exe file
Copy files for deployment
KuduSync.NET from: 'D:\home\site\repository' to: 'D:\home\site\wwwroot'
Deleting file: 'hostingstart.html'
Copying file: 'azureapp.exe'
Copy web.config
        1 file(s) copied.
Finished successfully.


Thursday, April 16, 2015

Running Go web app on Azure App Services (Websites) with custom deployment script

Short version:


Perform a continues deployment with code from this repo to your Azure Website. Once deploy, you should be able to see below result, a perfect test web app that use Go "net/http" package, Gin and Martini all together.


Behind the scenes:


The core is to understand GoDeploy.cmd script from repo, below are the key concepts:

To run Go app:
     Create a web.config as below. If you build your go app (exe file), all you need is upload your exe file and update web.config file to reference to it.


To build:

GOROOT:
    There is no GOROOT environment variable yet, but the binary is reside in "D:\Program Files\Go\1.4.2". define your own GOROOT and point to it

Build Script:

  •     Create workspace and config GOPATH point to it

              workspace:
                    {folder}/src
                    {folder}/bin
                    {folder}/pkg

    ECHO creating %GOPATH%\bin
    MKDIR "%GOPATH%\bin"
    ECHO creating %GOPATH%\pkg
    MKDIR "%GOPATH%\pkg"
    ECHO creating %GOPATH%\src
    MKDIR "%GOPATH%\src"


  • Create app folder under "{folder}/src", and copy source code into it
ECHO creating %GOAZUREAPP%
MKDIR %GOAZUREAPP%

ECHO copying sourc code to %GOAZUREAPP%
CP gotry.go %GOAZUREAPP%

  • Resolve dependencies and build
ECHO Resolving dependencies
CD "%GOPATH%\src"
%GOEXE% get %FOLDERNAME%

ECHO Building ...
%GOEXE% build -o %WEBROOT_PATH%\%FOLDERNAME%.exe %FOLDERNAME%

Monday, January 30, 2012

Windows Azure Storage Mapper

Open source project: http://azuredbmapper.codeplex.com/
The StorageClient library API is not that easy while you try to understand how the REST API is working for you.

Here I created an Azure Storage Mapper, which is purelly expose the REST API.
All what you read from MSDN about REST API, you will find it in Azure Storage Mapper.
Same wording, same way to use. Give you the very native feeling of Azure Storage.

Right now only support Table Storage... Blob Storage and Queue Storage is coming soon ...

Friday, December 10, 2010

How to run Ruby On Rails on Google AppEngine

There is a tutorial https://gist.github.com/671792 by John Woodell,
however it was costumed running in linux environment,
and there is some slightly changes they didnt update their tutorial script,
the script will not work out of box,
So in here i am making a post, especially benefit users who is using Windows, since i am doing this in Windows 7 environment.

PS : i assume u have already had a google app engine account, if u dont, do some bing or google and get one

Specially thanks for the help from Andrew Myers.

1) Install Java Development Kit  6 (JDK6)
make sure you have similar stuff show up in your windows command prompt

>java -version
java version "1.6.0_21"
Java(TM) SE Runtime Environment (build 1.6.0_21-b07)
Java HotSpot(TM) Client VM (build 17.0-b17, mixed mode, sharing)
>javac -version
javac 1.6.0_21

2)  Install AppEngine Java SDK http://code.google.com/appengine/downloads.html
Download the  SDK, and make sure you put the "bin" directory into your system "Path"


3) Install Ruby 1.8.7 , not JRuby
Download it http://www.ruby-lang.org/en/downloads/, and install it,
make sure you associate *.rb to be run by ruby  (for windows install, there is the check box)

again open a new command prompt, you should have something like this

>ruby -v
ruby 1.8.7 (2010-08-16 patchlevel 302) [i386-mingw32]
>gem -v
1.3.7

4) Install plugins for ruby
Make sure you open a command prompt as administrator

and type in the following one by one

gem install google-appengine
gem install rails -v "2.3.10"
gem install rails_dm_datastore
gem install activerecord-nulldb-adapter

each one will take a while, so be patient..

5) Make a directory to contain you ROR application
mkdir railsv1
cd railsv1
Or you can use GUI to do it.

6) Copy the code below, save it to a file, for example rails2310_appengine.rb

#!/usr/bin/ruby
#
# Copyright:: Copyright 2009 Google Inc.
# Original Author:: John Woodell (mailto:woodie@google.com)
#
# Licensed under the Apache License, Version 2.0 (the "License");
# you may not use this file except in compliance with the License.
# You may obtain a copy of the License at
#
#      http://www.apache.org/licenses/LICENSE-2.0
#
# Unless required by applicable law or agreed to in writing, software
# distributed under the License is distributed on an "AS IS" BASIS,
# WITHOUT WARRANTIES OR CONDITIONS OF ANY KIND, either express or implied.
# See the License for the specific language governing permissions and
# limitations under the License.

require 'fileutils'
require 'open-uri'

def composite(source, fragment, index = nil, trim = nil)
  File.open(source, 'r+') do |f|
    lines = f.readlines
    lines = lines[0..trim] unless trim.nil?
    f.pos = 0
    File.open(fragment) do |z|
      section = z.readlines
      if index and index.size < lines.size
        f.print lines[0,index] + section + lines[index..-1]
      else
        f.print lines + section
      end
    end
    f.truncate(f.pos)
  end
  FileUtils.rm fragment
end

def download_file(path, url)
  open(url) do |r|
    FileUtils.mkpath(File.dirname(path))
    open(path,"w"){|f| f.write(r.read) }
  end
end
SET_CMD = RUBY_PLATFORM.include?('mswin32') ? 'set' : 'export'
MORE_GEMS = 'rails_appengine/active_support_vendored'
FILE_BASE = 'http://appengine-jruby.googlecode.com/hg/demos/rails2/'
MOD_FILES = %w{ app/controllers/rails/info_controller.rb public/favicon.ico
                config.ru config/boot_rb config/environment_rb
                config/initializers/gae_init_patch.rb config/database.yml
                script/console.sh script/publish.sh script/server.sh }
# Install Rails 2.3.10
FileUtils.touch 'config.ru'
gemsrc = ARGV[0].eql?('tiny_ds') ? 'Gemfile_td' : 'Gemfile'
download_file("Gemfile", "#{FILE_BASE}#{gemsrc}")
download_file("gems_2310", "#{FILE_BASE}gems_2310")
composite('Gemfile', 'gems_2310', nil, -2)
FileUtils.mkdir_p 'WEB-INF'
download_file("WEB-INF/app.yaml", "#{FILE_BASE}WEB-INF/app.yaml")
system 'appcfg.rb bundle --update .'
# Remove dups and generate Rails app
# Generate rails, and skip APIs to escape the shell
system "rails _2.3.10_ ."
# Fetch configuration files
FileUtils.mkdir_p 'app/controllers/rails'
MOD_FILES.each { |path| download_file(path, "#{FILE_BASE}#{path}") }
if ARGV[0].eql? 'tiny_ds'
  download_file("config/environment_rb", "#{FILE_BASE}config/environment_td")
end
# Merge configs into boot.rb
composite('config/boot.rb', 'config/boot_rb', 108)
# Merge configs into environment.rb
composite('config/environment.rb', 'config/environment_rb', 30)
# install the nulldb adapter
system 'ruby script/plugin install http://svn.avdi.org/nulldb/trunk/'
puts "##"
puts "## Now type 'dev_appserver.rb .'"
puts "##"


and run it, e.g  ruby rails2310_appengine.rb, then you should see something like this:

Friday, July 16, 2010

When pervasive computing meet cloud computing, Infinite VS Infinite

Recently i am trying to propose a project base on my previous idea, of course a lot more detail than the pose, for my PhD study project. Now i am crazily reading papers from all kinds of area, Internet of Things, Pervasive Computing, Cloud Computing, try to identical the research value in my project.

Today just want to share some interesting finding during my reading.

In one paper "Pervasive commuting a paradigm for the 21st century" by Debasbis saba and Amitava Mukberjee. In the issues and challenges they mentioned,

"Though pervasive computing components are already deployed in many environments, integrating them into a single platform is still a research problem. The problem is similar to what researchers in distributed computing face, but the scale is bigger,. As the number of devices and applications increases, integration becomes more complex. For example, servers must handle thousands of concurrent client connections, and the influx of pervasive devices would quickly approach the host`s capacities. We need a confederation of autonomous servers cooperating to provide user services."

And as what we know from cloud computing, we can ask/rent as much as computing resource we want to deal with our need.

If a auto-scale framework/model with a multi tenancy architecture application can be created base on cloud computing, sounds like the issue mention in the paper will be easily solved.

And imaging if there is a standard that can build into all electric appliances, and there is a router like agent that can collect information/send control signal from/to those electric appliances, and process all these information in the multi tenancy architecture application up in the cloud, such kind of project will absolutely benefit human being a lot than we can expected

More, some of the projects demo in Oxygen MIT can be easily achieve without creating any new technologies as well.

Thursday, May 6, 2010

Relation Decoupling -- Migrate from Relational Database to Non Relational Cloud Database

Issue

Relation decoupling problem


When doing the migration, there are lots of complex join/ cross table selection query, or views which implemented by such kind of query


Possible solution:


1) To migrate such kind of data, seems we need to re-model the database, get rid of the relation in the database, and move these kind of logic to be application logic (code implementation).


Similar to Ruby On Rails, they handle all the relation in coding logic, database level relation is not a must.


2) Pre-Process relation, and keep all these result in database, when certain query come, server can return data right away.


This approach looks like some kind of data warehouse. Which might only suitable for application only do read action mostly.


But it doesn`t mean we cannot do write action.

We can ask the application direct request to another server which particularly  design for writing data.


The only drawback is that, the result might not be able to display in a instance manner.  It depends on how agile my “Process Engine” can be.


Thursday, April 22, 2010

A Peek at Multitenancy in Azure Table Stroage

As we know, the programming model for using Windows Azure Table Storage is  like the pic below


Every table can be partition base on custom Partition Key.
If we take the advantage of the Partition Key, we can easily create a multitenancy data struture.

For example, we want to create a multi user blog, just like blogger, we might have a table, call it "Posts", to store the post written by the users.
Obviously, we can use the username as Partition Key.
So base on the username, we can easily retrieve the corresponding set of data.


This kind of approach, data level multitenacy architecture, should be exist long time ago, but apply them onto cloud storage, will gain benefit that we cannot have in relational database.

Cloud storage will guarantee all data be stored highly distributed, and fully replicated.

Thursday, April 1, 2010

Cloud computing + IT management = Home Automation

I just have something in my mind that, there will be soon or already become real for some of the area, everything will be or has been able to connect internet.

And when talking about IT management, usually we will think of enterprise, company or education institute, when they are up to a certain size, they need a central administration to enable them to manage all the computing device.

However, people are invoke with technologies lot more than people live in the older days,
individual or family also need there own IT management ...

1) individual who want to use all his/her computer device all in one entry
2) family to share all the resource

And for sure, nowadays we can do things like this for enterprise/companies/education institutes


Migrate all the IT manage system onto the cloud,
instead of hosting the management system on-premises, we host it on to cloud.

For IT management vendor, they no longer need to maintain the server, they just focus on how to make there management software to meet customers needs.

And because the cloud can provide "pay as you go", now the IT Management vendor can also easily offer "pay as you go" for using there service.

Now interesting things happened.
The idea of office automation, home automation have been there for ages, but why still lots of the people cannot take the benefit, that is because it will be too much to buy, install and maintain the devices, software system all kind of stuff.

But now all the price are going down,
for IT management vendors, they can just create a multi-tenancy architecture IT management system.
and i assume all digital device will be able to control via internet,
and the multi-tenancy architecture IT management system will allow user to plug-in Printer, Fax machine, Fridge, Air Conditioner, Washing machine etc .....

then something like this can be happened


Imaging just like nowadays mobile plan service, maybe in the future IT management vendor will also offer home device management service, let say you pay 30 bucks a month, it will allow you to have a dashboard to see how much electricity you have been consume, what are the condition of the device, and allow you to schedule or even make a work-flow to turn on and shutdown devices etc.....


Bullshit ends...

A pattern for how to do monitoring on distributed, large scattered applications

Coming soon ...

Real project was done, will be update once some copy right issue is done ...

Friday, February 12, 2010

WCF Service In Windows Azure Worker Role

I am going to show you how to create a WCF web service which will be hosted on a worker role in Windows Azure.

Before we continue, i assume you already know how to create a helloworld WCF web service, also know how to deploy application onto Windows Azure and know what is input endpoint.

Step 1 - Create a WCF Service

When creating a WCF service, always we need to define a contract and them implement it.

There is one thing i need to raise. When implementing the contract, and if you want to use any other binding rather than BasicHttpBinding, we need to specify
[ServiceBehavior(AddressFilterMode = AddressFilterMode.Any)]


using System;
using System.Collections.Generic;
using System.Linq;
using System.Runtime.Serialization;
using System.ServiceModel;
using System.Text;

namespace WorkerRole1
{
[ServiceContract]
public interface IMessageDeliver
{
[OperationContract]
void DoWork(string message);
}
}


using System;
using System.Collections.Generic;
using System.Linq;
using System.Runtime.Serialization;
using System.ServiceModel;
using System.Text;
using System.Diagnostics;
using Microsoft.WindowsAzure.ServiceRuntime;

namespace WorkerRole1
{
[ServiceBehavior(AddressFilterMode = AddressFilterMode.Any)]
public class MessageDeliver : IMessageDeliver
{
public void DoWork(string message)
{
Trace.TraceInformation("{0} Receive Message - {1}.", RoleEnvironment.CurrentRoleInstance.Role.Name, message);
}
}
}


Step 2 - Open a port to listen

In the ServiceDefinition.csdef, we need to define a InputEndpoint, so that the outside world can talk to our worker role.

I am going to use NetTcpBinding, so i make the port as tcp. The other options you can have are http and https, which need to be match to the binding u are going to use.


Step 3 - Combine WCF with the port we open


ServiceHost serviceHost = new ServiceHost(typeof(MessageDeliver));

NetTcpBinding binding = new NetTcpBinding(SecurityMode.None);

// define an external endpoint for client traffic
RoleInstanceEndpoint externalEndPoint = RoleEnvironment.CurrentRoleInstance.InstanceEndpoints["MessageDeliver"];

string endpoint = String.Format("net.tcp://{0}/MessageDeliver", externalEndPoint.IPEndpoint);

serviceHost.AddServiceEndpoint(typeof(IMessageDeliver), binding, endpoint);

serviceHost.Open();


Step 4 - Create a client to double check


ChannelFactory cfactory = new ChannelFactory(new NetTcpBinding(SecurityMode.None), "net.tcp://accountname.cloudapp.net:10080/MessageDeliver");

var client = cfactory.CreateChannel();

client.DoWork("hi from shrimpy");

Done !!! Have fun ...

Tuesday, December 15, 2009

Auto migrate exising ASP.NET application onto Windows Azure


Source code Package AutoDeployRobot_WithCommandFile.zip

In this video I am going to show how to migrate a existing ASP.net Application to Windows Azure.

There will be two way, 1) via application 2) via powershell script


SOmething you need to know:

We will use Azure Management API and Azure storage API for this demo.

In order to pass Azure Management API authentication, we need the Subscription ID and a Self-signed X509 certificate

In order to pass Azure storage API authentication, we need the Account Name and Access Key

When try to do auto deploy, we have to save deployment file onto azure blob storage first, then ask Windows azure to look for the file from the storage to make the deployment.


Demo 1, migrate via an application which implentment by using Azure Management API and Azure storage API

1) show the existing asp.net application

2) create a service definition file

3) use cspack to pack the application

4) upload file onto blob storage

5) deployment onto windows Azure

a web role "Ganda" will call the management API to deploy the application onto Azure, after that, the web role pass a message to a worker role "Ant", the worker

role will keep checking the satus of the deployment, once it was deployed, the worker role will ask the deployment to run


Demo 2, migrate via powershell script

automatically do all the job from step 3 to 5 in demo 1

Thank you for watching...

Monday, September 28, 2009

All the bad things in Amazon Web Service

Hi folks.... This article is going to list all what i experience the shit stuff from Amazon Web Service...

I admit that AWS is very powerful, but you have to be convinced that nothing is perfect, they will have their down side...


1) You can`t delete an instance from your list after you terminate it.
Your instance list will keep growing, depending on the "garbage clean up" of AWS. AWS say they will delete your termination instance at later certain period of time. But when??? Only God will know.

2) You can`t restart a terminated instance
Amazon will keep billing you if you do not terminate the instance. This is painful, coz sometime we just want to do some test setup, not really launch the server for real. Let say i want to install five piece of software into my machine, today i do two, and want to do another three tomorrow. In EC2, I cannot say turn off the computer and restart it again tomorrow. I have to pay for the extra idle time.

3) It is hard to do Authentication programatically
Either Query Approach or SOAP Approach, Amazon do not provide detail in-depth tutorial or document to guild us developer to do the authentication.
All we got is a simple page, to show us, we need to do URL Encoding when using Query API, we have to attache the X509 certificate with every request we make when usning SOAP API.
That is all....
No wonder the opensource project Typica and Netflexity-amazonws-ec2 is so popular in Amazon support forum....

I was trying to use native Query API and SOAP API at the begining...but give up after a few hour try...i give up..coz there is no documentation..i end up reading source code from Typica and Netflexity.....so i just us Typica........so frustrated...

But on the other hand..Microsoft Windows Azure management API is so easy to use.
I learn and play straight away...

4) Amazon-EC2-AMI-Tools Linux only
This tool set, there is no support for Windows.
Have to use third-party tools such as ElastixFox (Firefox plugin)

5) Disk limitation when bundle Windows Instance (create custom windows AMI)
The basic template we can get from Amazon is a windows 2003 server with C drive only 10G.
And we cannot chance the size of the C drive.
Why i keep mention the C drive, coz all custom stuff, if you do not put into C drive, when you perform bundle, only C drive will be bundle, all other data in other drivers will be ignnore.
(Linux instance also has similar problem, all custom stuff have to put under /mnt, otherwise your own data won`t be bundled)
Coz the work i am doing is that, i need to raise multiple instance which running the same application.
So my solution is that, i create my own AMI, which has been config everything, when i what more, i just raise a instance from that AMI.
But with 10G limitation, i just cannot feel satisfaction, lucky everything i need after installing into the C driver, there still 3 to 4 G space left...but i just cannot imaging...how about my application become larger?...dose it mean i have to give up using Amazon EC2???
Anyway, i haven`t totally confirm that there is no way to walk around this limitation.
I saw one of the post in the Amazon support forum, they say we can plug-in volumn for extra space...hmm..i am thinking, whether when create a custom AMI, we can bundle the volumn as well.
Further investigation is needed... and i will keep update after if anything is found...

To be continue ...

Monday, September 21, 2009

Time to build a version control app for Azure

Introducing the Windows Azure Service Management API


Azure has release its management API.

Now azure has most of the stuff, but there is one thing Azure do not have.

Deployment version control....

If you want to down-grade your deployment, and if your stageing deployement is not the down grade version.

there is no way for you to down grade.

Since the management API has been release....it is time for version control now....


Blueprint:

Feature:
1) Do not store any user information
2) Store data in user`s storage

Howto Implement:
1) The Version Control App(VCA) is a web portal
3) When user come to VCA, user need to provide keys, subscritionID etc,
for VCA to access SQL Azure or Table Stroage, in order to store version info, to access Blob storage, in order to storage deployment files.
4) VCA is only a graphical interface. But behind the scene, some logic were applied to organize those data, in order to provide version control. And for sure, VCA will invoke Azure Service Management API, to help user swap deployement doing upgrade or downgrade.

Monday, August 31, 2009

How to do stateful Registration In Windows Azure when using multi instances

Microsoft Windows Azure cloud enable you to horizontally scale out your application by modified the number of instance on the fly, and the fabric controller will handler the load balance for you.

But one issue is that, u cant do stateful application for this kind of scale.

For example, user login.
Normally the way we do login is that. Once the user has been successfully login, we put some of the data into session, so that our application will know the user has been login within the time out duration.

ISSUE
However, when multi-instance running the same piece of application, if you store info in one of those instances, the other instance wouldn`t be aware of the user has been login.

Below is the work around for using multi-instances.


What i am going to do is that,

Web Roles:
Every time a web role receive one request, check whether there is a login record in the table storage, if the data existed (e.g we can use the userid for RowID, if the userid existed), then see the lable "expired" for every row,

if it is false, which mean the user has already login, update the label "last_visit"
otherwise, hasn`t login, direct to login page.
after successful login, create one entry in the table.


Worker Role:
Schedule tasks to check the session table, see whether "current_time" - "last_visit" > time out
if true, set "expired" to true, otherwise set to false.


Concerned
1) Data consistency
Data might updated by one instance, but when another instance call for the same piece of data, that data might not be updated, maybe still getting the old value.

2) Too much over head

Conclusion:
I think this approach is doable.

For consistency, even the value we read is the old value, which mean the time out wouldn`t be the exact time as we specify. Maybe it will be a bit larger or smaller then the expected value.

For over head. There is something we need to compromise, in order to have horizontal scalability.


How about other Cloud
:

I only want to talk about Google App Engine here, coz gogrid or amazon web service, there are more likely offer "vertical scale out".

In Google App Engine, they already offer user the MEM-Cache, which can be shared by all the instances. And the access time or speed is fast.

Which mean it would be easy and simple to implement my approach in Google App Engine.
And we won`t has the two concerns as well.

Saturday, August 22, 2009

News about cloud computing evaluation on Microsoft Windows Azure, Google App engine, Amazon Web Service

Previously, Liang, Fei and I did a cloud evaluation project under the guidance of Professor Anna Liu.

Now seems our report is going to be release to be a publish....

Anna was interviewed by ITNews,and talked some of the result from our project.
Cnet also publish a short article about Anna`s talk.

Hopefully by the time our report is released, we will get some good feedback.

Friday, August 14, 2009

Poor .Net Service Bus Java SDk ...

In this article i am NOT going to show you how to do things with .Net Service Bus Java SDK.

But show you some of the facts i found out from my experiments.
(I used Metro to create service to connection to .Net Service Bus)


1) Java To Java Only support SOAP 1.2

I was struggling for some days, when i didn`t pay too much attention on the release notes,
and trying to create a demo, asking java subscriber to talk to java publisher.

Later my friend Liang found out that, Java SDK only support SOAP 1.2 protocal.

Coz by default, metro is using SOAP 1.1.
So when you program with metro, make sure u specify proper binding for your impl class


SOAP 1.2
@BindingType(value="http://java.sun.com/xml/ns/jaxws/2003/05/soap/bindings/HTTP/")


2) Too much overheading

First let`s have a look how many packages would be sent if we use .Net technology to .Net technology

Start from the highlight.
Only four package will be sent for doing one round-trip conversation.

Now let have a look at the java to java (Be prepared and don`t be scared).
Yep..i am not joking, the whole page, starting from the top till the end of the pic,
it took so much to finished one round-trip conversation.


.Net Service Bus, another proposal between java and C# in REST approach

In this tutorial i will show you how to communicate between java techology and C# technology in REST Approach

Scenario:

A console C# application want to provide service onto internet, so register an endpoint in the .Net Service bus, which allow people making REST request.

After knowing there is a service in the .Net Service Bus, someone include such service into there java application with the help of HttpClient library.


C# service :
In this part, we are going to create a REST service provider by using WCF framework.

1) Create a normal C# console project from Visual Stuido, choose what even name you like.


2) Within the project, create a service contract.

3) Leave the contract blank first, coz we need to import some WCF reference.

4) Now we can implement our contact with WCF annotation.

5) After we have the contract, it is time to do the Implementation for the contract.


6) Bravo ... After all the boring jobs above, we now can create endpoint onto .Net Service Bus.
So here we include the Service Bus reference into our project first.


7) Create endpoint onto .Net Service Bus.
This time i will do something different. If you have read my previous articles, you would find that we normally need a App.config file, however it is not a must, we can do everything in programmatical way, just the matter which way u want.

using System;
using System.Collections.Generic;
using System.Linq;
using System.Text;
using Microsoft.ServiceBus;
using System.ServiceModel.Web;
using System.ServiceModel.Description;
using System.ServiceModel;
using Microsoft.ServiceHosting.ServiceRuntime;

namespace ProposalService
{
class Program
{
static void Main(string[] args)
{
Console.WriteLine("Host starting ...");

//Console.Write("Your Solution Name: ");
string solutionName = "shrimpy";

//Console.Write("Your Solution Password: ");
string solutionPassword = "password";

// create the endpoint address in the solution's namespace
Uri address = ServiceBusEnvironment.CreateServiceUri(
"http",
solutionName,
"proposal");

// create the credentials object for the endpoint
TransportClientEndpointBehavior userNamePasswordServiceBusCredential =
new TransportClientEndpointBehavior();
userNamePasswordServiceBusCredential.CredentialType =
TransportClientCredentialType.UserNamePassword;
userNamePasswordServiceBusCredential.Credentials.UserName.UserName =
solutionName;
userNamePasswordServiceBusCredential.Credentials.UserName.Password =
solutionPassword;

WebServiceHost host = new WebServiceHost(typeof(ProposalContractImpl), address);

ContractDescription contractDescription =
ContractDescription.GetContract(typeof(ProposalContract), typeof(ProposalContractImpl));
ServiceEndpoint serviceEndPoint = new ServiceEndpoint(contractDescription);

serviceEndPoint.Address = new EndpointAddress(address);
serviceEndPoint.Binding = new WebHttpRelayBinding();

serviceEndPoint.Behaviors.Add(userNamePasswordServiceBusCredential);

ServiceRegistrySettings settings = new ServiceRegistrySettings();
settings.DiscoveryMode = DiscoveryType.Public;
serviceEndPoint.Behaviors.Add(settings);

host.Description.Endpoints.Add(serviceEndPoint);
host.Open();

Console.WriteLine("Service address: " + address);

Console.ReadLine();

host.Close();
}
}
}


Testing our service.
Now the service is ready to go. Launch it, and go to your browser to test it.
Theoretically, you should see something like this:

Still remember how our C# contract look like???
I beg u must forget all about it...


[OperationContract()]
[WebGet(UriTemplate = "/{words}")]
string says(string words);

In the contract we said that, anything follow by the link will tread as input of method "says"
So as in the pic, if we type something following the "proposal" should trigger method "says".

Let`s do it. See the location in my browser:


And then hit enter

Oooops.......
Don`t be scared, this page is from Microsoft, asking for valid login. Type in our solution name and password, it will first ask the Access Control service to do a check up, whether we have the right to get into the service on the other side. If the solution name and password are all good, it will return us a security token. For browser, the token will put into cookie, so that we can continue to visit our service.

Bingo............ we get what we expected.......


Java RESTful subscriber
Now we have already half way to Rome. We just need to do a rest request from the java side.

1) Create a empty maven project. Choose any name u want.

2) Modify the POM, add HttpClient dependency, so that we can make REST request later.
3) It would be good to do logging when doing coding.
So create a folder "resources", and create log4j.properties file under the folder


Content of log4j.properties:


log4j.rootLogger=OFF, STDIO

log4j.logger.org.apache.commons=ERROR

log4j.logger.com.blogspot.cloudyshrimpy=DEBUG
log4j.appender.STDIO=org.apache.log4j.ConsoleAppender
log4j.appender.STDIO.layout=org.apache.log4j.PatternLayout
log4j.appender.STDIO.layout.ConversionPattern=%14p [Cloudy Shrimpy] %30.30F:%L| %x %m%n

4) So good so far, now it is time to do some real coding.
Let think of what should we do first.

From the white paper, it said that, in REST approach, we first need to ask for security token from Access Control Service by providing solution name and password.
After we obtain the token, attache the token in http request header, then we can visit the REST service on the other side.

So very straight forward i will do things like this:


public static void main(String[] args) {
App app = new App();

/**
* Get Authentication Token
*/
String security_token = app.getAuthenticationToken();

/**
* Send message
*/
app.sendMessage(security_token, "Will you marry me");
}


Then we implement method "getAuthenticationToken" and "sendMessage"


private void sendMessage(String token, String words) {
// replace space with '%20'
String endpoint = String.format(SERVICE_URI, words.replaceAll(" ", "%20"));
log.debug("Endpont is : " + endpoint);

GetMethod get = new GetMethod(endpoint);
get.addRequestHeader(HEADER_KEY, token);
try {
int status = client.executeMethod(get);
log.debug("Request status is : " + status);

if (status == HttpStatus.SC_OK || status == HttpStatus.SC_ACCEPTED) {
byte[] responseBody = get.getResponseBody();
String responseContent = new String(responseBody);
log.debug(String.format("Response is : %s", responseContent));
}
} catch (Exception ex) {
log.error("Failed to send request to service is : " + endpoint, ex);
}
}

/**
* https://accesscontrol.windows.net/issuetoken.aspx?u=SolutionName&p=SolutionPassword
*/
public String getAuthenticationToken() {
String token = null;
try {
String uri = String.format(ACCESS_CONTROL_LINK_TEMPLATE, USERNAME, PASSWORD);
GetMethod get = new GetMethod(uri);
int status = client.executeMethod(get);
if (status == HttpStatus.SC_OK) {
byte[] responseBody = get.getResponseBody();
token = new String(responseBody);
log.debug(String.format("Token is : %s", token));
}
} catch (Exception ex) {
log.error("Failed to obtain authentication token.", ex);
}
return token;
}


You will see lots of upper case words in my code, just because i don`t want to hardcode string. So below are all the magic strings i used.


private static final Logger log = LoggerFactory.getLogger(App.class);
/**
* Solution name and password
*/
public static final String USERNAME = "shrimpy";
public static final String PASSWORD = "password";
/**
* Link to get security token
*/
public static final String ACCESS_CONTROL_LINK_TEMPLATE = "https://accesscontrol.windows.net/issuetoken.aspx?u=%s&p=%s";
/**
* Target endpoint that message we are going to sent to
*/
public static final String SERVICE_URI = "http://shrimpy.servicebus.windows.net/proposal/%s";
/**
* Attribute that going to be add into the http header
*/
public static final String HEADER_KEY = "X-MS-Identity-Token";
/**
* Client that use for making REST request
*/
private HttpClient client = new HttpClient();


Good now keep your C# service launching, and run your java application.


Do u get what i got?????

Saturday, August 8, 2009

Big Issue in .Net Service Bus When trying to communicate between JAVA and C# technology in SOAP approache

Last week i was thinking to create a tutorial to show people, how different technologies can interact by using .Net Service Bus.

However after last week`s experiment, seems that, .Net Service Bus hasn`t implement such functionality yet.

Ok..seeing is believing.....let me show you how i found out the fact.

My source code can be download from below.

Publisher In C# http://shrimpysprojects.googlecode.com/files/PublisherDemoInSoapV1.rar

Subscriber In Java http://shrimpysprojects.googlecode.com/files/DotNetServiceSubscriber.zip


Over View:

What i did for last week is that, i create a publisher service in C#, plugin into .Net Service Bus, then i create a java subscriber, and ask for service from the .Net Service Bus.


Part one, C# Publisher Service

In this service, i am going to use wsHttpRelayBinding.

Actually i had tried most of the bindings, basicHttpRelayBinding, webHttpRelayBinding and even netTcpHttpRelayBinding.

Q: why TcpHttpRelayBinding
A: 老板 also working on the same issue, try to make java communicate with C#, he try netTcp as well, i think the reason it that, when using java sdk, it only support sb as prefix.

The result turn out to be that,
with netTcp and wsHttp, i got http 500 internal error,
with basicHttp and webHttp i got http 400 bad request error.

Later in this artile i will show u the soap package as well.

Let start to set up the project first.


Step One:

Create a normal C# console application


Step Two:
Create interface for service contact and the impl of interface


Step Three, App.config

Final Step, Invoke service API, register the service onto .Net Service Bus


In the end, the whole project will look like this:


Now right click on the project, choose

Debug-->Start new instance

Theoretically you are supposed to get the app up and run


Part Two, create WSDL file

Base on the C# interface, render a set of WSDL file, so that later we can use it to create java subscriber.

I created a WCF project, base on the contact (interface) to create the WSDL, XSD files

When testing wshttpRelayBinding and netTcpRelayBinding
the WCF project use wsHttpBing to generate WSDL, XSD file

When testing basicHttpRelayBinding and webHttpRelayBinding
the WCF project use basicHttpBinding and webHttpBinding to generate WSDL, XSD file

Please refer to my source code .

The WCF project was create within the publisher project, it was a sub project.
Publisher In C# http://shrimpysprojects.googlecode.com/files/PublisherDemoInSoapV1.rar

if you want the WSDL file, go into DotNetServiceSubscriber.zip, under src/wsdl, you will find what u want.

Subscriber In Java http://shrimpysprojects.googlecode.com/files/DotNetServiceSubscriber.zip


PS: make sure you have fixed the endpoint and the url reference,

e.g
Cox i put all the wsdl and xsd file together in one folder,
when getting the file from WCF, in some file, you will see

Http://xxxxxxxxxxxxfilename.wsdl

make sure your change it to

filename.wsdl

also, change the endpoint to

sb://solutioname.servicebus.windows.net/endpointname

Part Three, create java subscriber

Base on the WSDL file, create a subscriber to connect to .net service bus.

Step one, create a .net service bus java project

Please refer to my prevous article
to set up a java project first.

.Net service bus maven project set up with JavaSDK


Step two, add "wsimport" into POM

wsimport can easily parse WSDL and XSD file and generate us java code

Create a folder call "wsdl" under your src folder, and place all WSDL and XSD file into this folder.
Then edit your POM file as below


As you see from above, if you build the project, extra java code will place into your src folder,
these extra java code is the contact we can use with .Net service Bus Java SDK.


Final Step , create subscriber

Learnt from the sample of jdotnetservice.com, i create the subscriber as below


Now all the preparation have been done,
It is time to witness .Net Service cannot allow Cross techology communicate with SOAP approache.

Launch your publisher service,
then run the java subscriber..
..

and you will get error information like these:


With the error info above, we don`t know what stage we had up to, so i sniffer all the package,
you can see from the pic below, we actually pass all the authentication, and find the service on the bus.

However the bus failed to link the java end and C# end together.

Q : WHY i can say that???
A: Because my C# code hasn`t get invoke yet...all the error happened before getting into my C# code


Also from the package sniffer, we can see the fault message


Ok...let dig this problem one more step further..
In my C# project, i also create C# subscriber, it works perfectly. so i sniffer its package as well..

so now we can compare what are the difference between soap package sent out from the C# subscriber and java subscriber

SOAP package from C# subscriber:


SOAP package from Java subscriber when WSDL was generate from wsHttpRelayBinding:

SOAP package from Java subscriber when WSDL was generate from basicHttpRelayBinding or webHttpRelayBinding:


We can see that, the java SDK absolutely got some problem, otherwise, the chatroom will not always be there.

But this wouldn`t be the case that affect the communication, as we can see, in C# subscriber, it did not have a "from".

and when comparing these three file, we can see that, java subscriber use WSDL generate from basicHttp or webHttp binding , the soap package sent out would be almost the same as the C# subscriber..

But this raise a issue...

For what i experience, Java SDK for .Net Service Bus only support SOAP 1.2, (Another article will be come soon, taking about limitation of .Net Service Bus java sdk. which base on my prevouse prototype work, i created a java publisher and a java subscriber, and let them talk with each other)

So when creating C# publisher, we suppose to use wsHttpRelayBinding

However, from the SOAP package, there are big different betweent the C# subscriber and java subscriber which was using WSDL from wsHttp binding...